Making videos can be tough. Whether you’re trying to make creative video for social media, putting together a marketing video, or creating some stock footage to insert into your video, it takes a lot of effort.
I’ve spent hours editing videos myself, and sometimes it feels like there’s just too much to do.
When I first heard about Vidu studio AI, I was curious. Vidu studio is supposed to make video creation a lot easier.
But does it really? I decided to give it a try and see if it could actually help me get things done faster and better.
In this article, I’ll share what I found when I used Vidu AI video generator. I’ll talk about the features that stood out, like how it handles multiple camera angles and the cool effects you can add to your videos. I’ll provide full Vidu studio ai tutorial.
So, if you’re wondering whether Vidu AI studio free can help you create ai videos without all the hassle. Keep reading, I’m here to give you the real story.
What Is Vidu Studio AI?
Vidu sudio AI an ai video generator tool designed to create 4/8-second videos based on a simple text prompt or a reference image.
Just to let you know, this isn’t your typical video editor where you drag and drop clips, add transitions, and spend hours refining the final cut. Vidu AI text-to-video is all about speed and simplicity—generating short, impactful ai videos in just a few seconds guided with prompts and reference images.
How Vidu Studio works?
Now, let’s talk about the technology behind this powerful tool. Here’s how it works:
- Natural Language Processing (NLP): When you give Vidu studio AI a text prompt, it first uses Natural Language Processing to understand what you’re asking for.
- Image Analysis: If you provide a reference image instead, Vidu AI uses image recognition technology to analyze the picture. It looks at the objects, colors, and overall composition to decide how to turn that image into a short video clip.
- Video Generation: Once Vidu AI understands your prompt or image, it moves on to video generation. Using a pre-trained model, the AI assembles a 4-second clip that captures the essence of what you’ve asked for.
- Rendering and Output: Finally, Vidu studio renders the video, adding any final touches like smooth transitions or effects, and delivers it to you, ready to be used wherever you need it.
The whole process takes just a few minutes, which is a huge time-saver compared to traditional video editing.
How to create AI videos using Vidu studio AI : Step by step guide
If you’re thinking about giving Vidu studio AI a try, here’s a step-by-step guide on how to get started with Vidu AI:
Step 1: Access the Vidu studio AI Tool
First, head over to the Vidu AI creation page at vidu.studio/create. Yes, of course! You have to create an account and login first.
Once there, you’ll see a simple and clean interface designed to help you get started right away.
Step 2: Input Your Prompt or Image or Reference Object
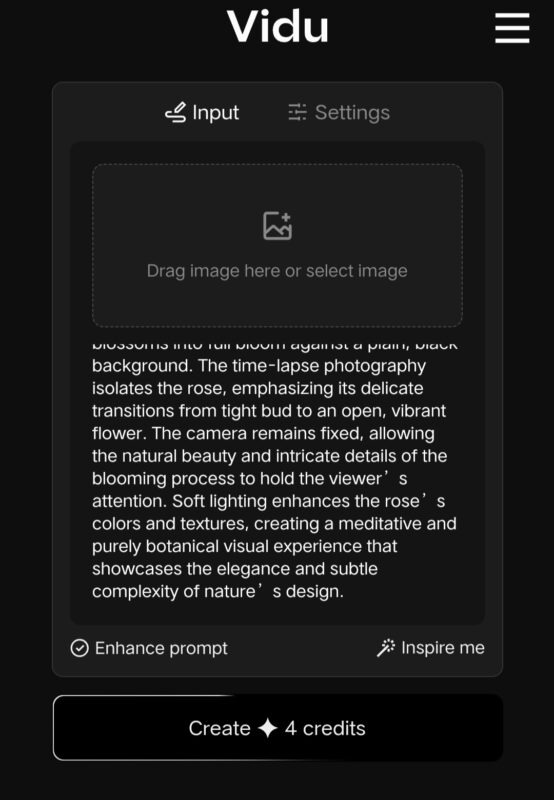
Add a Prompt:
In the “Input” section, you have a box where you can type in a prompt. This could be anything you want your video to focus on.
For example, I tried the following prompt:
Capture the journey of a single rosebud as it blossoms into full bloom against a plain, black background. The time-lapse photography isolates the rose, emphasizing its delicate transitions from tight bud to an open, vibrant flower. The camera remains fixed, allowing the natural beauty and intricate details of the blooming process to hold the viewer’s attention. Soft lighting enhances the rose’s colors and textures, creating a meditative and purely botanical visual experience that showcases the elegance and subtle complexity of nature’s design.
The result was a beautiful, meditative video showing a rose blooming gracefully in a simple yet elegant setting.
Upload a reference Image:
If you have a specific image you want to base the video on, you can drag and drop the image into the same box or click to upload. This feature is perfect if you want the video to reflect a particular visual style or content.
Here’s another example I tried:
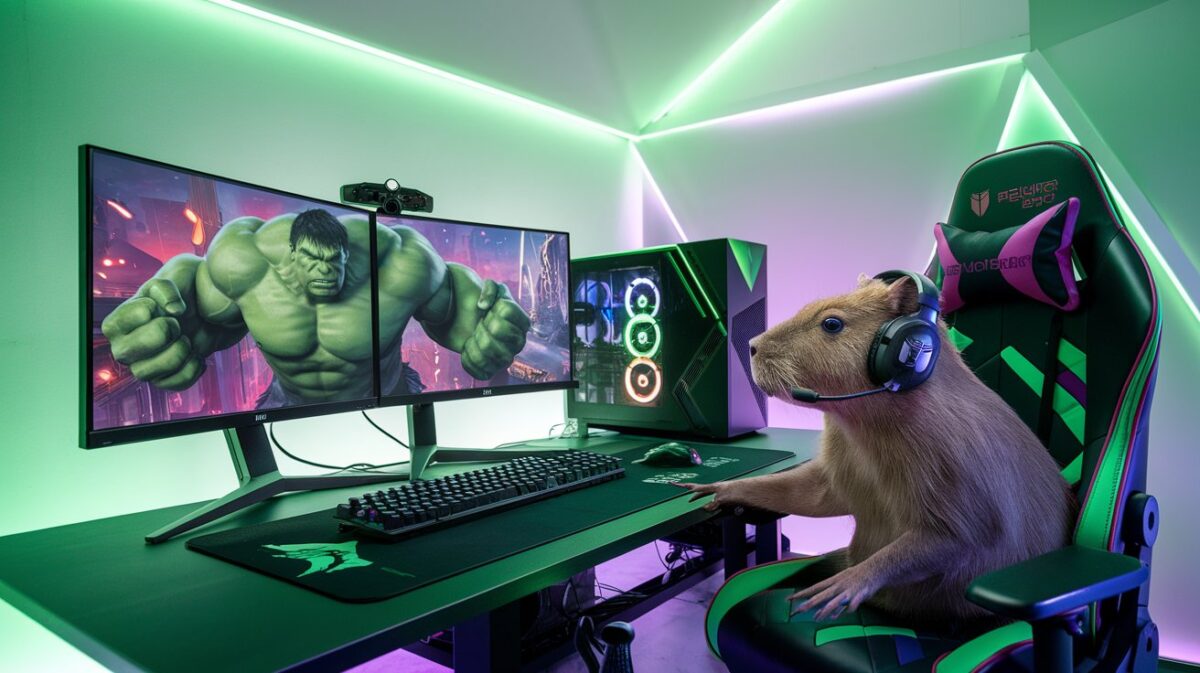
Prompt: “Hulk is showing anger in the display of a computer and there is a capybara on the chair wearing a headset and being excited while watching the Hulk.”
By uploading a relevant image and using this prompt, Vidu AI generated a quirky and fun video that perfectly captured the scene I had in mind—a capybara engrossed in a Hulk movie on a computer screen.
Upload a reference Image
This feature is helpful when you want to target a character from the image, like you have your own photo and want to create a video with your face.
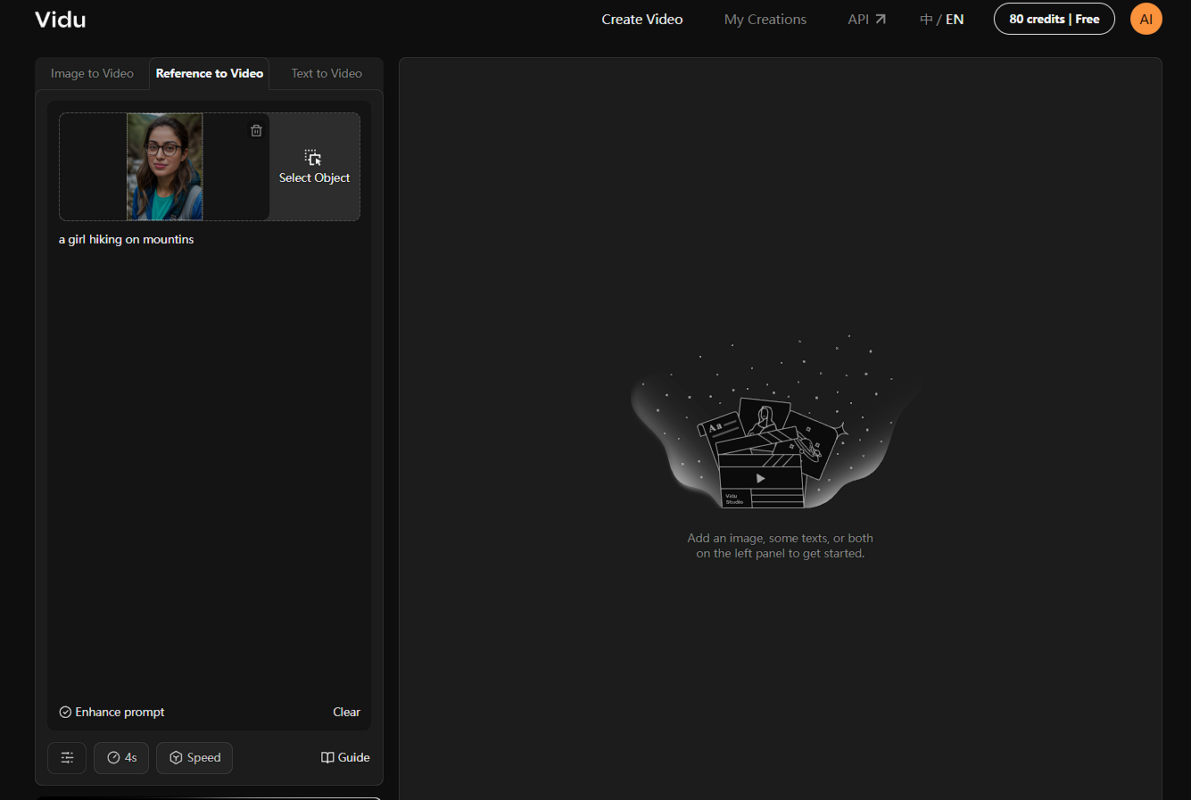
Here, you have the option to select any specific character, object of the image and then the video will be created based on this object.
I uploaded a girl’s face and added the prompt “girl hiking on mountains” but the results were not satisfactory. I tried 1 more time and still the results were bad. The video were shaking and making the object blurry.
Step 3: Choose Your Settings
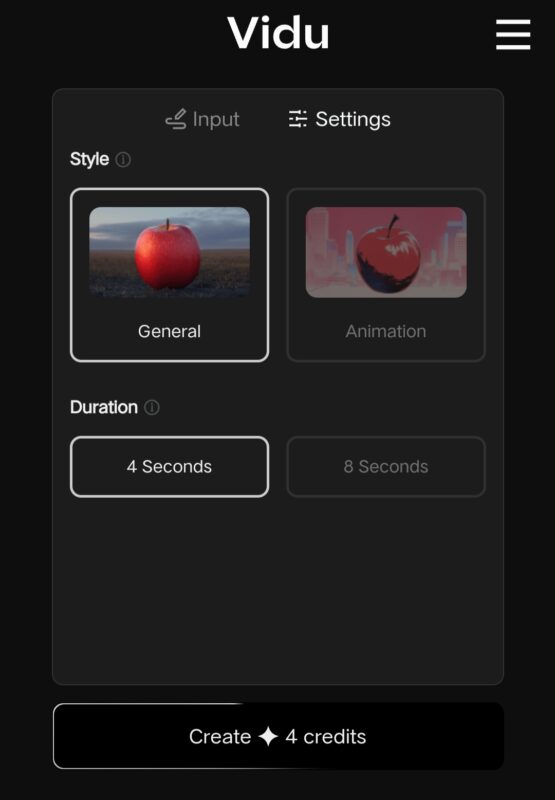
Next, you’ll want to adjust the settings to match your needs:
- Style: Here, you’ll have options like “General” or “Animation.” The “General” style is great for straightforward visuals, while “Animation” adds a more dynamic, animated feel to your video.
- Duration: You can select the duration of your video. The default option is a 4-second video, but if you need something a bit longer, there’s an 8-second option available with Pro subscription.
Step 4: Create Your Video
Once you’ve input your prompt or uploaded an image and selected your desired settings, all that’s left is to hit the “Create” button. Keep in mind that each video creation uses up 4 credits, so make sure you have enough credits before starting. By the way, you will get free 80 credits to use for free.
Step 5: Refine Your Video
After your video is generated, you’ll see some additional options:
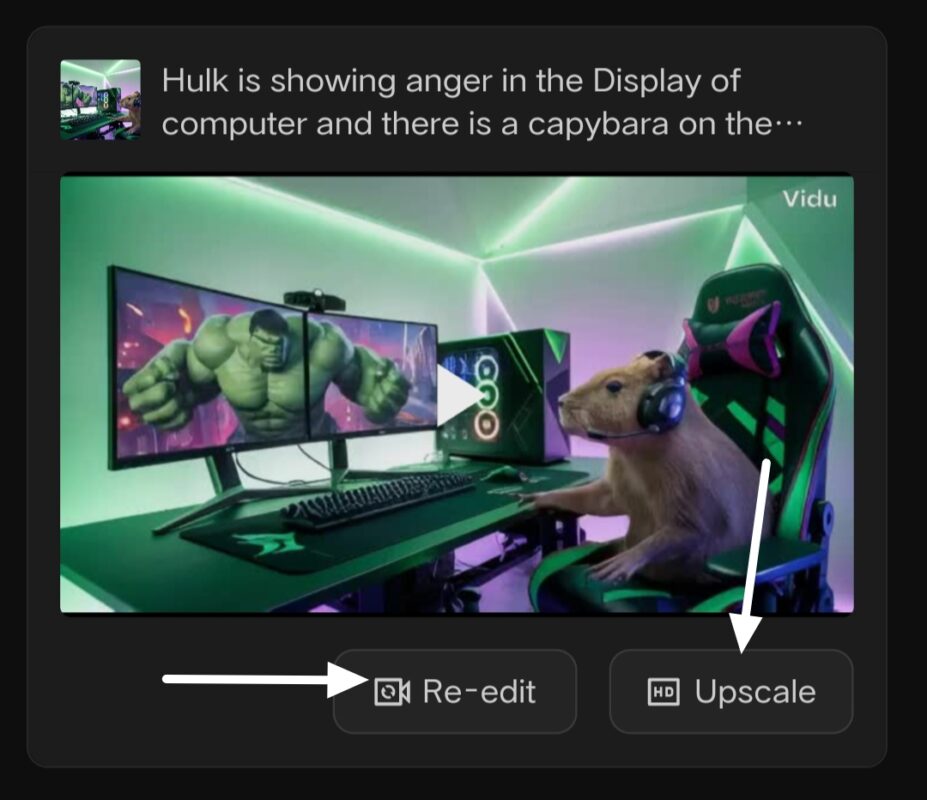
- Re-Edit: If you’re not entirely satisfied with the outcome, you can go back and tweak your prompt or settings to get a better result.
- Upscale: If you need your video in higher quality, Vidu studio offers an upscaling option to enhance the resolution and detail of your clip. The quality of the upscaled video was really good.
I upscaled my second example video, here are the results:
Step 6: Download and Use Your Video
After Vidu AI has processed your request, your video will be ready for download within 4-5 minutes, it may be less or more depending upon the queue.
Simply save it to your device, and you’re good to go. Now you can use this video in your marketing campaigns, social media posts, or any other content you’re working on.
Key Features of vidu studio ai
Now, let’s get into the specifics. Here are the features that stood out to me while using Vidu AI:
1. Dynamic Camera Transitions
Vidu AI video generator seamlessly creates transitions between close-ups, long shots, and medium shots within a single clip, mimicking the techniques of experienced videographers. Vidu studio AI makes it very easy.
2. Rich Visuals and Effects
If you need high-quality templates or eye-catching transitions, vidu studio can achieve it easily by providing proper guiding prompts. This process involves understanding the visual context—what’s in the foreground, what’s in the background, and what kind of movement might make sense in the video.
3. Advanced U-ViT Technology
It relies on U-ViT, a technology that excels in capturing real-world physics and generating highly realistic and detailed videos. U-ViT also enables the creation of fantastical worlds and scenarios, offering versatile creative possibilities.
4. Flexible Input Options
You can create videos from either text descriptions or images, or a combination of both, offering versatile creative possibilities.
5. Realistic Video Quality
Vidu Studio produces videos with lifelike effects and high visual fidelity, ensuring that the generated videos have a realistic and professional look.
6. Vidu AI image to Video
Not only can you create videos with just a prompt, but Vidu AI also lets you upload an image to generate a video. Image can be used as a character or the first frame of your video. The tool does a great job of blending your prompt and image together smoothly, creating a video that feels seamless and intentional.
7. Reference to Video
Reference to video feature is what, where you can upload a character or object image which you specifically want in your video, like you have your own photo and want to create a video with your face.
Where Vidu AI stands out?
I’ve tried many tools, but Vidu AI stands out. It’s not just about speed (though it’s fast). It helps take the pressure off, letting me be more creative. I’ve used it to create short stock videos for my explainer videos. I just have to write a simple prompt and gives me what i wanted.
Vidu AI vs. Other AI Video generator Tools
Now, I know you’re probably wondering how Vidu studio AI stands out against other tools out there. I’ve seen video created by Sora AI and Kling AI, and used some other ai video generators like runwayML, Haiper AI.
So here’s a quick comparison:
1. Vidu AI vs Sora AI
Sora AI is powerful, but it’s more suited for large, complex projects. For everyday tasks, it can feel like overkill. Vidu AI, on the other hand, is perfect for making polished videos without needing advanced skills. It’s easy to use and doesn’t make you feel bad for asking simple questions. For fast, high-quality video edits, Vidu AI is the better choice.
2. Vidu AI vs Haiper AI
Look, Haiper AI video generator is fantastic for creating ultra-realistic videos, but it’s like using a high-end camera for a quick selfie—it’s a bit much for everyday needs. Vidu AI, though, is more like your go-to tool for easy, high-quality video creation. It’s user-friendly and perfect for whipping up great videos without needing any special expertise. It hits that sweet spot of quality without the hassle.
Is Vidu AI Worth It?
So, is Vidu AI worth your time and investment? Let me share my experience and thoughts.
After spending some time with Vidu studio AI, I can tell you that it’s not just another tool; it’s a practical, time-saving solution for anyone who needs quick video content and strong competitor to Kling ai and Lumalabs’ dream machine ai.
What I appreciated most that it was really easy to use. I didn’t have to figure out complicated settings, everything was just in-front my eyes and I could understand it in friction of seconds.
It’s perfect for those moments when you need something polished but don’t find those footages anywhere on the Internet.
But let’s be clear—Vidu AI isn’t designed to replace full-scale video editors. It’s all about simplicity and speed. If you need short, engaging videos—say, for inserting some stock footages into your YouTube video, or even a creative project—Vidu AI does the job beautifully.
Vidu AI Pricing
Vidu AI studio offers plans ranging from a Free option to a Premium plan, each tailored to different needs.
Tip: Start with the Free Plan to explore, and consider upgrading as your content needs grow.
Final Words
After exploring everything Vidu AI has to offer, I can confidently say it’s a tool worth your time, for creating short ai videos.
You don’t need to be a tech pro to make videos that look great. The flexible pricing lets you start with a free plan, so you can see if it fits your needs before committing to a paid plan.
Overall, Vidu Studio is great for anyone who wants to create videos quickly and easily. If you’re unsure, try the free plan and see how it works for you.
FAQs about Vidu Studio AI:
What is Vidu AI?
Vidu AI is a tool that allows you to create short, high-quality videos using a simple text prompt or an image. It’s designed for people who want to generate quick, visually appealing content without needing advanced editing skills.
How does Vidu AI work?
You enter a text prompt or upload an image, and Vidu AI uses its technology to generate a 4-second video based on that input. It blends your prompt with any images you upload to create a cohesive video.
Can I use my own images in Vidu studio?
Yes, you can upload your own images. Vidu studio AI video generator will use your image as a character or the first frame of the video, integrating it seamlessly with your prompt.
Is Vidu AI difficult to use?
Not at all. Vidu studio AI is designed to be user-friendly. You don’t need any technical skills or experience in video editing to create something great with it
Can I edit the videos after they’re created?
Yes, Vidu AI offers options to re-edit or upscale your videos after they’re generated. This allows you to make final tweaks or enhance the quality.
Is there a free trial available in Vidu AI?
Vidu studio offers 80 credits when you sign up, so you can try it out and see if it meets your needs before committing to a purchase.


